

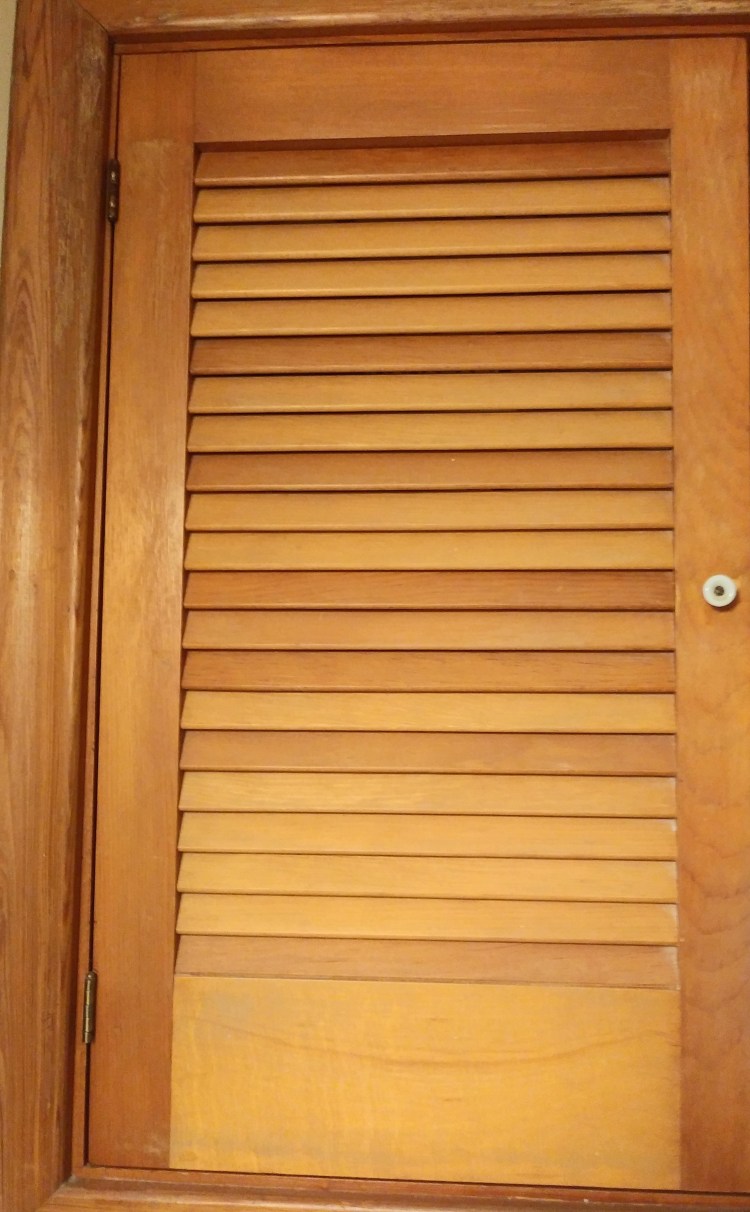
Our house is one big DIY project, and my husband has really been getting into tackling some tasks that were once outside of his comfort zone. Most recently, after painting all of the trim in our house, we ended up with just several louver doors remaining. Fueled by a complete and utter dread of having to paint louver doors, we decided to look at alternatives. First, we thought the obvious – buy new doors? We could, but the doors we have are a strange size, and honestly, we didn’t want to spend the money right now.
We have louver doors on our bathroom closet/cabinet, a hall closet door, bifold doors leading to our bathroom, the bar in our den…they really are all over the place – it would have cost quite a pretty penny to just replace them. But we knew we didn’t want to keep the look that was hanging around from the 1960s.
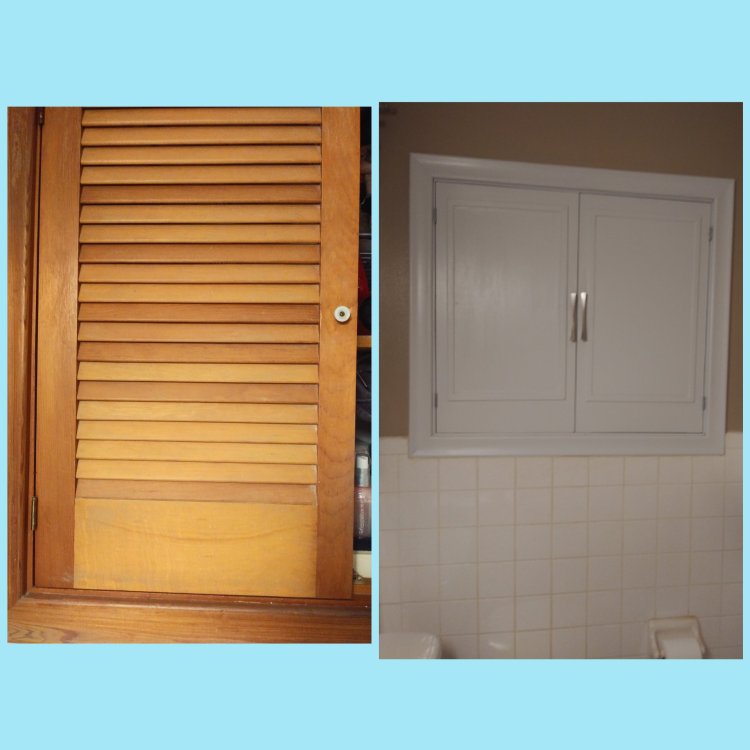
We found several different suggestions on how to give louver doors a facelift, and since my husband is fairly new to the woodworking world, we opted to cover them and trim them out. He did most of the work (I just offered guidance, lol, and helped with caulking, because that is something my hubby is not a fan of doing).
Here’s everything we used for our project (how much you need of certain materials is of course up to how many doors you’re refreshing, and things like handles and knobs are a matter of preference):
- Thin plywood (we used Revolutionply 5mm Poplar Plywood)
- Trim (we used flat, pine screen molding, 3/4″)
- Wood glue (we used Elmer’s Carpenter’s Glue, which is super strong, waterproof, non-toxic, and paintable)
- Screwdriver
- Degreaser/cleaner
- Sponge
- Paintable Caulk/Caulk Gun
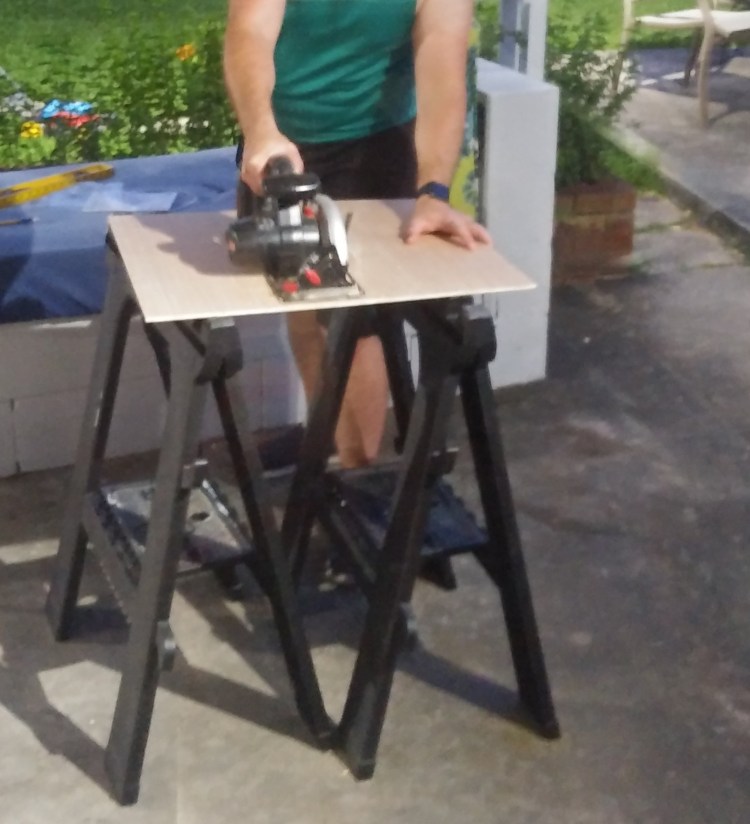
- Circular saw
- Sawhorses (or something to support the wood when you saw)
- Safety Glasses
- Finishing Nails
- Hammer/Nail gun
- Paint
- Sandpaper/Sanding Sponge/Sander
- Miter box and hand saw
- Door Hardware/Handles/Knobs
- Silver Spray Paint (optional: we sprayed our existing gold hinges)
First, prep the louver doors that will be getting a facelift. Remove any hardware using a screwdriver, clean the doors well with a damp sponge and let dry thoroughly. If your doors have any grease or build-up, use a degreaser to make sure you end up with a flawless paint job that will hold up well. (We love Krud Kutter for really getting through all of the stuff that can accumulate on doors in heavy traffic areas like kitchens and bathrooms. Plus, it’s non-toxic and biodegradable, so it’s a safer choice for the environment).
Now it’s time to cut the panels that will cover the louver sections of your doors. Measure out and mark the correct size on the plywood and then use the circular saw to cut your panels. (Measure twice, cut once! And don’t forget your safety glasses). We had a circular saw and sawhorses, if you have a table saw, lucky you! 🙂 Remember to cut on the “wrong side” (the side that you won’t be using) of your lines to account for your saw blade (usually about 1/8″) so your panels don’t come up short. (We remembered that after our first panel, lol).
Lightly sand the edges of your panels to get rid of any rough spots and then position over the louver sections of your doors. Use finishing nails or a nail gun to attach the panels. Make sure your nail heads are slightly sunk so you can spackle over later before you paint. This was a learning moment for us, we started with a hammer and nails and then decided the light-duty power nailer was the way to go to get the nail heads in a little deeper.
Next, it’s time to add the trim! Measure out your molding and use your miter box and handsaw, or miter saw if you have one, to cut your trim at 45-degree angles. Keep in mind you’ll be cutting these at an angle, so account for that when you measure and don’t cut too short. Use wood glue to attach the trim to your louver door, carefully placing it around your newly installed panel.


Now it’s time to make your doors look brand new! Caulk around the inside and outside of the trim, including corners, to help fill in any spaces. Smooth out the caulk with a wet finger, starting from one edge and steadily working your way to the other, wiping off excess caulk as you go. Allow the caulk to dry according to the directions, spackle any areas that need to be filled (we had to fill the hole from the old knob because we opted to put on new handles, as well as a few dings that had accumulated over the years) then apply your first coat of paint. We love Behr’s line of Paint & Primer in One. We used Silver Tradition, which is a very pale gray.


After about an hour, apply a second coat of paint for a nice smooth finish, then once dry, install your hardware. Overall, we’re super pumped about how they turned out, and we just have a few adjustments that we need to make — not too bad for the first time. The whole process didn’t take too long, especially considering we were also learning as we went, so it will only get faster the more doors we do! Plus, it was a lot cheaper than buying new doors. Double win! 🙂

So, that’s how our lover doors went from outdated to updated without breaking the bank. Plus, it was fun and rewarding to do it ourselves (mostly my husband, lol).
Think you’ll give this a try? Have you updated your louver doors in a different way? We’d love to see it!! 🙂
*As an Amazon Associate I earn from qualified purchases.

You two are the dynamic-duo of updated cabinet doors! They look really pretty- love the color you chose! And the look Is very professionally done. Great job! And Stacy, really nice step-by step instruction for the rest of us👍
LikeLike
Thank you!! Only 7 more doors to go, lol! 😁
LikeLike